 |
| A Frosty-licious Cake Pop |
Every December, the church from my hometown holds a "Holiday Shop" to raise money for all sorts of charities and organizations. This year I donated some time and effort in the form of cake pops.
I know...it's ridiculous how many cake pops I made, but I absolutely LOVED the way they turned out. Very cute, very festive and every part of them edible. Seriously people, nothing is too cute to eat!
The Frosty and Reindeer pops were inspired by Bakerella (shocking, I know!). The Santa pops were my own creation, after some trial and error, I think they turned out pretty well. Here's a closer look though, I'll let you decide...
What I loved about these were how easy they ended up being after I just figured out what I was doing...granted that took a few tries. The santa belt is made of melted chocolate covered with black sanding sugar and the belt buckle is fondant covered in gold luster dust. I used a black edible ink marker for the belt detail and the buttons are black confetti sprinkles. Phew! Happy Holidays, cake pop style.
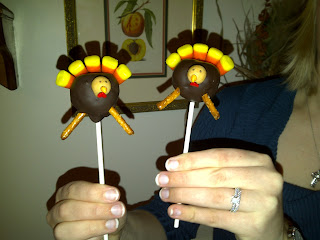
I'm going in reverse for this blog entry, because my previous project was Turkey pops. I actually made these last year for Thanksgiving, but couldn't think of a cuter idea this year, so here they are again!
 |
| Ok, these are just the heads...creepy, right? I love them. |
 |
| Hand Modeling provided by my younger sister, Betsy |
 |
| There she is! |
If you're going to attempt Turkey Cake Pops, make sure you have a lot of time on your hands because these things are labor intensive. I watched an entire movie while gluing on candy corn feathers. Just a warning. On the other hand, they're super cute and it's great watching my cousins' little ones chow down on them.
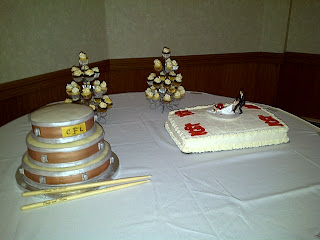
FINALLY! One of the biggest projects I've ever taken on, if not the biggest. Ok, definitely the biggest. I made a wedding cake for one of my coworkers. She wanted a unique cake, one that resembled a drum set. She also wanted a St. Louis Cardinals themed sheet cake. This was the type of project I had to head home to Jacksonville for. There's no way my poor tiny little kitchen could have handled it. Plus, I needed the expert help of my mom (professional piper of icing borders) and my sister Abby (expert holder of wedding cakes in cars) and my dad...who pretty much just let me yell and stomp my feet when things weren't going the way I wanted them to, then told me how awesome I was. Everyone needs people like this.
Anyway, here's a picture timeline of the whole process which involved the following:
Chocolate Cake with Cream Cheese Icing
White Cake with Champagne Buttercream Icing (yes, it's as good as it sounds)
White Cake with Chocolate Cream Cheese Icing
Red Velvet Cake with Vanilla Buttercream Icing
Cupcakes of an assorted variety and Vanilla Buttercream Icing
(When the going gets tough, the tough eat buttercream icing...holy yum)
A day in the life of a drum cake...
Ok, we're done here. Next week will be photos of my cookie exchange / Eclipse party. Yes, you read that right. I know you're excited.


